Many parents have asked me about Dora the Explorer Party supplies. Well, they were to be in March and March has passed.
So here are some ideas for parents that want to have a Dora party for their children.
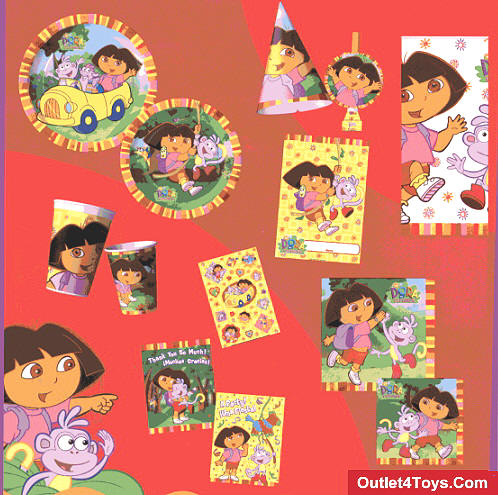
They are finally here. Birthday Supplies on the shelves at your Local Walmart.
For the Party Supplies:
Uses the Colors of Dora or Boots. Pick you child favorite character and go from there. For example if you were going
to have a girls party use Dora's colors.
Tablecloth: purple ( backpack that Dora never leaves behind)
Cups: Yellow ( for her socks)
Plates: Pink ( for her shirt)
OR
if you were going to have a boys party use Swiper's colors.
Tablecloth: Blue ( for his gloves and mask)
Cups: Yellow ( for his mouth)
Plates: Orange ( for his coat)
To decorate the table go to a Party supply store and buy mexican paper flowers. Get some styrofoam cups. Turn them upside
down the flowers will hide them. The cups are for the Dora characters. Go to the Nick Jr. Site print off each of the characters
on Cardstock. The cardstock is for duribility. next glue or tape to a dowel or paint stick. Stick the characters in to the
cup facing the children. if it is the round arternate the charatersfacing out.
Violet paste or gel food coloring (available at baking-supply stores)
2 cream-filled snack cakes (Twinkies)
8-in.-round cake pan
8-in.-square cake pan
Butter or margarine and flour (for greasing and dusting cake pans)
Resealable plastic bags
Step 1 Preheat the oven to 350°F. Grease and flour an 8-inch-round and
an 8-inch-square cake pan. Prepare the cake mix according to package directions. Fold the mini chips into the cake mix. Divide
the batter evenly between the prepared cake pans. Bake the cakes until golden and a toothpick inserted in the center comes
out clean, about 35 to 40 minutes. Transfer the pans to a wire rack. Cool for ten minutes; then invert and cool the cakes
completely.
Step 2 In the meantime, unwrap yellow fruit chews and heat them in the
microwave for five seconds to soften. Roll together all but one piece, making a 4- by 7-inch rectangle. This will be Map.
Cut the remaining piece in half diagonally for Backpack's eyebrows and set it aside.
Step 3 Make eyes by cutting the white taffy into two sizes, 1 1/2 inches
and 3/4 inch. Cut the red taffy into a 3-inch crescent and a 1-inch triangle for Backpack's and Map's mouths. Set aside.
Step 4 Spoon two teaspoons of the white frosting into a resealable plastic
bag and set it aside. Divide the remaining frosting into thirds. Tint each bowl a different shade of purple; from light to
dark. Spoon the darkest purple into a resealable plastic bag.
Step 5 Cut the round cake in half, making two semicircles. Cut out a 2
1/2-inch-wide strip from the square cake. Place the large cake rectangle in the center of a cake platter so the long sides
are at the top and bottom. Place one semicircle on either long side of the rectangle with their cut sides facing in. The top
semicircle should overhang the right side of the rectangle by 1 1/2 inches. The bottom semicircle should overhang to the left
by 1 1/2 inches.
Step 6 Using a bit of the medium-purple frosting, attach the two cream-filled
cakes along the left side of the cake. Make Map by rolling the yellow candy rectangle around the top snack cake, letting some
overhang at the top.
Step 7 Cut the leftover rectangle of cake into a 4-inch and a 2-inch piece.
Place the smaller piece at the top of the cake so it fills in the gap between Backpack and Map and helps support Map. Place
the longer rectangle at an angle by the upper-left corner of the cake, to make the shoulder strap. Trim the pieces slightly
to round the cake's corners.
Step 8 Using the photo above for reference, frost the part of the cake
that will be Backpack's face with the lightest purple frosting. Frost the snack cakes, Backpack's top, the shoulder strap,
and the sides of the entire cake with the medium-purple frosting. Snip a small corner from the bag of dark-purple frosting
and pipe along the sides of the cake using a top-to-bottom, zigzagging motion.
Step 9 Trim and attach the licorice as a strap. Place the eyes, eyebrows,
and mouths on the cake and on Map. Use the candy-coated chocolates as the center of the eyes. Spoon chocolate frosting into
a resealable plastic bag. Pipe chocolate lines around the eyes, mouths, and around Map use chocolate frosting to write a birthday
greeting.
Recipe by food stylist Karen Tack
You could try to decorate the cake that is on the Nikc Jr. Site or have your child color a picutre of Dora and take that
to Walmart or some store that can do that new cake decorating where they transfer the image onto the cake.
In our family were do not buy cakes we buy Cakes we get Krispy Kreme's Glazed. You just need to make sure that they have
a hole in them. By a tall candle that you might use in a candle labara. set that in the middle. Slide the krispy kreme's over
the top. They make a pyramid shape out of the krispy kreme's. Go on to the Nick jr site and print off the coloring pages let
you child color them or you color them and then shrink them down to about three inches tall. You will want to print them off
on cardstock. glue or tape them to toothpicks. Stick the toothpick all over the cake.
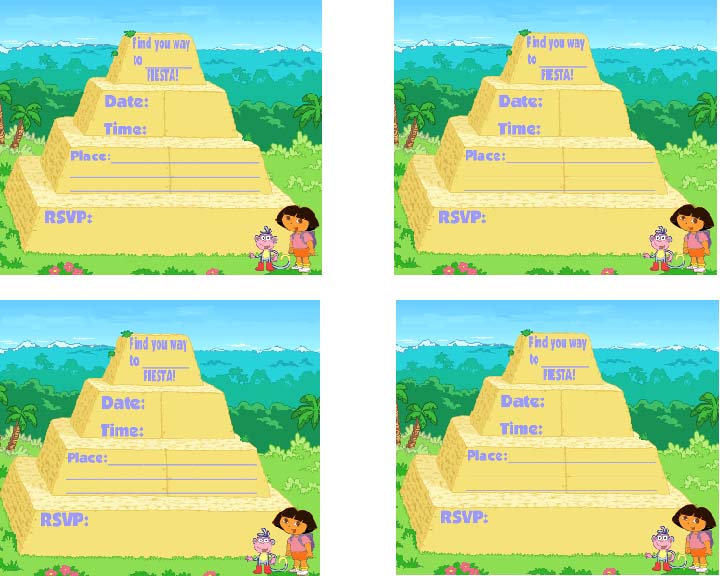
For invitations make your own using the coloring pages or print the invitation that are provided on the Nick Jr. site.
Either way print them on cardstock. It helps to make the invitation look store bought.
Favors:
Be creative. Decorate your own bags.
One idea you cold do is buy a bunch of white shirts and iron on transfer Character images on to the shirts. Get some
fabric pens let the children color their own shirts they will have so much fun doing it.
Here is a postcard Dora invitation that I made using the Food Pyramid layout. You can use it as a Birthday Card postcard.
I would print them out on cardstock. By doing this it makes the cards look store bought.


